Tips For Better Travel Photography

At its best, photography is a powerful way to tell stories. And in that storytelling, photography can bridge the divide between cultures. It allows people to gain a better understanding of people and places they have not otherwise seen, and it illuminates our common humanity.

When we travel, we have a unique opportunity to use photography as a tool that doesn’t simply document what a different place looks like, but it also allows us to meet and appreciate new people and cultures.

Travel photography, at its best, is more than a record of your trip. It’s a way to understand others, and share that understanding. So here are some basic practical travel photography tips followed by ways to reconsider your travel photography as visual storytelling.

  1. Travel light (as in not heavy) If you haul all your gear with you, you’ll always want to leave it behind at your hotel or Air BnB, because who wants to schlep? The key is to minimize your gear and have it with you always. Bring a body (but leave a spare in the hotel safe just in case), and the bare minimum of lenses. Keep them in a camera bag that will protect them from wet or dusty conditions. Unless you’ll be shooting after dark, or using long exposures around dusk or before sunrise, you can leave your tripod in the room.

  2. Travel light (as in the light you see while you travel) Speaking of sunrise and dusk, those are often the best times for good light when you’re at home, and the same goes for when you’re on the road. So get your butt out of bed while it’s still dark, and get to your location early for pre-dawn and sunrise light. Likewise, you should be shooting when it’s magic hour through dusk. Midday when the light is bad is for staying indoors and editing your take.

  3. Bring lots of cards and a backup drive. Try to have enough memory cards with you so that you don’t have to download and re-use cards while you’re traveling. Memory is cheap, so have enough cards and at least one backup hard drive that you download your photos to every day.

  4. What’s the story? Just like at home, look for what’s honest and storytelling. Read up on your destination ahead of time, and consider what kinds of photos you’d like to take that tell the story of the place you’re visiting. Your photos may reveal something about the place’s past, its people or current issues. To have an understanding of any of those, you’ll need to do your research.

  5. Take notes. If you wait until you get home before you start captioning your photos, your memory will have failed you. What’s the name of that town where we saw that glass blower? So keep notes about where you are, who you photograph, what events you’re shooting.

  6. Scout ahead. Look online for photos from your destination, it may give you ideas for locations. Find out about the place and culture you’re visiting, including on social media. Can you connect with a photographer who is already there? Or one who has visited your destination?

  7. Safety. You can travel most of the world without a worry, but in some situations a tourist with expensive camera gear is seen as prey. So if you can travel with someone who will watch your back, it can’t hurt.

    Once I visited the abandoned mining town of Rhyolite to get a photo with star trails in the sky. I was completely alone, in a Nevada desert ghost town, near the edge of Death Valley, some two hours from Las Vegas. Just me and my car and a couple of cameras and tripods. Around 3 a.m., I saw the headlights of a car turning off the highway and coming up the rough road through town. The car passed me, went up a few hundred yards and stopped. then it turned around, rolling back past me slowly.

    There I was, in the middle of the night, alone in the desert. And like an idiot, I had been listening to a podcast about the Manson Family murders. Paranoia got the better of me, so before the car came back, I packed my gear in my car and left. It means I didn’t stay long enough and try to get a better photo. Having someone with me would have helped.

  8. Treat people with kindness. You’re a visitor, an outsider. This may sound elementary, but being a tourist with a camera doesn’t give you a license to walk through someone’s life, take photos without asking, and walk out. The people you’ll see on your travels - whether you photograph them or not - aren’t there as props to provide scale for some pretty buildings and works of art. So say hello, and ask permission of the people you photograph, show them the photos on the back of your camera, and send them some. Really do it, don’t just say you will. People from other cultures aren’t exotic and other so don’t exoticize them. They’re people just like you.

  9. Respect the culture, and blend in. Yes, your camera may set you apart and attract attention, but aside from that you can try to dress in a way that is culturally correct and sensitive. Not because you’re camouflaging yourself or appropriating another culture, but because you’re showing respect for the people you’re visiting. A woman may want to wear a headscarf in places where it’s expected.

  10. Be in the moment. For many photographers, the entire reason they travel is to take photos. But don’t forget to acknowledge the people and the place that you are visiting. Every once in a while, put down your camera and just appreciate where you are.

Editing and archiving your photos, Part 1

I was talking with a wedding photographer who told me he loves shooting the events, but once it’s over, he can hardly bring himself to look at his photos. He’s overwhelmed by having 1,500+ photos to sort through, and he doesn’t know where to begin.

So he sits there paralyzed by the task at hand, and by the time a few weeks have gone by and his increasingly frustrated client has emailed him several times, asking for their photos, he’s a wreck. He does his edit under great pressure, rushing through it and missing some of his best work.

He’s unhappy, his client is unhappy. I can’t imagine his business has very good word of mouth.

I know some photographers don’t like editing their own work, but when you’re a freelance photographer running your own business, you end up as photo editor by default. So how do you make the best of this situation? You use a system that’s easily repeatable, one that brings you through the process and makes it less intimidating.

I spent more than half of my professional career as a newspaper photo editor, where selecting the right photo and meeting deadline were paramount. Another thing newspaper photo editors value is having a great archive filled with photos from older assignments that can be easily sorted through when you need to find a file photo. As a freelance photographer now, I’m using the skills and tools my newspaper career taught me, to edit and archive well.

If you’re not a pro at editing your work, or if you have problems finding that photo you know you shot that one time, read on.

Editing and archiving are interlinked parts of post-processing, but it’s best to cover these two topics in separate posts. Oddly, the process begins at the end result. So let’s get started with what you want to end up with.

When you’re done with your edit, you’ll have a folder of photos from a job. You’ll be able to tell what the photos are just from looking at the folder’s name. You’ll be able to open the folder and find your best work, without even viewing a photo. And you’ll be able to find photos by searching for keywords. The days of opening folders and clicking on images to find what you’re looking for are over. Oh, and eventually you’ll have an archive with your work sorted by date, with your most recent work at the top. Every folder in that archive will open so you see your best work first.

To do this, you’ll need some specialized digital asset management software - which you may already own. If you don’t, some are available free. The software is for browsing a group of photos, adding metadata, selecting, culling, and renaming the images. Some examples are Photo Mechanic, Adobe Bridge, IrfanView, Expression Media and XNView MP. The industry standard for photojournalists, and my choice, is Photo Mechanic. But it’s not cheap, and something like XNView MP is freeware for non-corporate users. If you have an Adobe suite, you may already have Adobe Bridge. That does everything you need it to.

The software must fit your needs - if you shoot RAW images, make sure it handles the latest RAW files from your camera’s manufacturer. It must be able to batch change metadata and filenames. It must have some system for selecting images so you can mark your favorites and the images you intend to trash.

Here’s the step-by-step process.

  1. Create a folder on your computer, if you don’t already have one, for ALL of your photos. It can be an external drive if you want. Name it “PHOTOS” or whatever you’d like.

  2. Now create a new folder inside that one for the images you are about to edit. Every shoot/job/assignment gets its own folder.

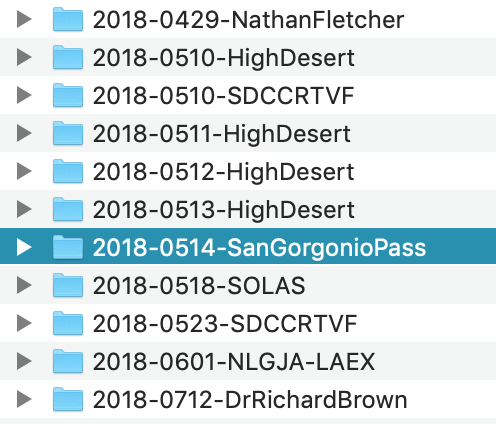
  3. Name your folder. The folder’s name will eventually match the names of the images that go inside it. The name is very important, as it will give you information and it will become part of your archive’s hierarchy. Use this method for every folder name: YEAR-DATE-SLUG. A “slug” is a one-word shorthand description of your photos. For example, photos I shoot of a marathon on March 15, 2020 would go into a folder named 2020-0315-Marathon. If you want, you can also do something like 200315-Marathon, or 20-0315-Marathon. Always start with the year.

    The beautiful thing about this is that as you add more and more folders, they will automatically be sorted by date, with your newest work always at the top when you open your PHOTOS folder. Just because of how they are named. That’s why you always start with the year, then the date.

  4. Import your images into your YEAR-DATE-SLUG folder. Use a card reader, and import all the images from that assignment. If you used more than one card, repeat this step until all images from your shoot have been copied into that folder. Eject the card and remove the card reader.

  5. Open your YEAR-DATE-SLUG folder with your batch editing software (Adobe Bridge, Photo Mechanic, XNView MP, etc.) and add the metadata.

    What is metadata? It’s the non-image information embedded in digital photos. It includes a photo’s exposure, the date and time the image was made, the kind of camera and lens used, the caption, keywords, the name of the photographer, copyright and licensing information, etc. Some metadata is added to the image during the exposure by the camera itself, and other information (such as keywords and licensing information) later, by you.

    The metadata you want to make sure you add is keywords, a batch caption that applies to all the images, your name, website and copyright information and the location where the photos were taken. You can add the same metadata to all the photos at once, but then add even more metadata to smaller groups afterwards. For example, a wedding photographer may batch add the same metadata to all the photos - date, location, caption, names of the couple, etc. But then after that they can go in and batch add “cake,” “rings” “flowers,” “first kiss” to just those photos that need them.

  6. With your YEAR-DATE-SLUG folder still open in your batch editing software, select all your images and sort them by capture time.

    Do you have more than one camera? Make sure their date and times are synced and accurate. That way when you sort the folder by capture time, the images shot around the same time will appear near each other.

  7. Now that your images are sorted in the order you shot them, go back to your folder and copy its name. In this example, that’s 2020-0315-Marathon. You are going to batch rename your photos next, so that all of them will have the same name of that parent folder, followed by a sequential number. Set your sequence to start at 200, so your first image is renamed 2020-0315-Marathon_200, your second image is renamed 2020-0315-Marathon_201, etc. Why do we start at 200? So you can later re-rename your best photos to a lower number. Eventually, after your edit, you will open your folder and find your best photos are at the top, easily found, because they’ve been renamed 2020-0315-Marathon_001, 2020-0315-Marathon_002, 2020-0315-Marathon_003, etc.

    But not yet. We rename those best photos during our edit. And that’s in the next post.

Editing and Archiving your photos, Part 2

You don’t want to be the frustrated wedding photographer I mentioned in the first part of this post. You want to be undaunted in the face of dozens or hundreds of photos from a shoot. And you want to know you’ve picked the best photos from your take during your edit. Let’s walk through the steps of your edit.

If you’ve followed the steps in the previous post, you should have a folder, named with the year, date and slug, of your photo shoot/assignment/job. That folder should be loaded with your images, which have been renamed the same as the folder, and numbered sequentially starting at 200. Metadata has been added to these images.

Open that folder with your browsing/digital asset management software. Keep your photos sorted by time, and make sure you’re looking at thumbnails, rather than one photo at a time.

Your folder of images, renamed starting at 200 and shown in Photo Mechanic, should look like this.

Your folder of images, renamed starting at 200 and shown in Photo Mechanic, should look like this.


Your browsing software (Photo Mechanic, Adobe Bridge, XNView MP, etc.) has ways of marking individual photos, and then later grouping them based on those marks. You may use a number or a letter on your keyboard to add little stars, a color, checkmarks, etc. You will need at least three different marks to rate your photos, and a simple checkmark approach only gives you two - is it checked or unchecked? So find what your software offers that allows you to mark different ratings on your photos. If it’s keyboard-based, rather than a mouse click, that’s faster.

Go through your images as thumbnails, and mark the ones that jump out at you with one rating, for example the number 1. This should be a fairly quick edit. If you leaned on the motor and you have a small group of similar images, just mark them all with the number 1. You’ll take a closer look later.

Just pick the ones that really work, even as thumbnails. If they look good as small photos, that’s a good sign.

As you’re going through, you might see some stinkers. The ones that are really out of focus, embarrassingly awful accidental exposures, etc. Hey, it happens to all of us. Mark those with your number 3. So as you’re going through your take, you’re marking the best and the worst of what you see.

After you’re done, have your software select the #3 photos, so you ONLY see those really bad ones. There probably won’t be too many. Make sure you didn’t include anything good in that batch by accident, then select them all and trash them. You’re not going to use them, ever, so throw them out. All they’re doing is taking up disc space and making you feel like a bad photographer.

Now go back and select your #1 photos. Start looking at them not as thumbnails any more, but so they fill your monitor, one at a time. This way you’re checking for critical sharpness. And if you had a sequence of similar photos, you’ll want to compare them against each other so you determine your favorite from that sequence. Keep all the best images selected as #1, and deselect all of the images that are not as good. Often this is done by clicking the zero on your keyboard, but there are different ways to do this.

What you’re looking for is “I knocked it out of the park.” Those are your best, your #1 photos. Hitting singles and doubles is okay if we learn from them, but they’re not what we’re aiming for.

When eliminating your second-best, pay close attention to moments, story-telling details, subtleties of light. Is there something distracting in the foreground or background? If so, can it be cropped out? If two photos are real similar, what separates them? Something is always going to make one photo weaker than another.

When you’ve gone through the entire batch of #1-rated images and you’ve settled on your selection of the very best among them, that’s your first edit. Look at those photos. Hopefully they tell the story you’re trying to tell.

Now ask yourself if there’s something missing. Did you not pick a photo from the married couple’s first dance? From the cake-cutting? If so, now is your chance to go back and find it. It may not be as strong as the photos you already selected, but if it helps tell the story, you’ll want to add it to your edit.

Don’t be self-indulgent, however. Your second edit isn’t an excuse to start adding mediocre photos that you know aren’t very strong. All you’re doing here is filling in any gaps, making sure your story is complete.

Don’t be emotionally attached to bad photos. Just because you brought your shiny new drone to an assignment, that doesn’t mean you need to include a drone photo in your edit.

So be honestly critical and brutal about your work. Be as a judge in a contest, as if you were looking at someone else’s photography. It doesn’t matter how hard you worked to get a certain photo if the resulting photo isn’t good enough. You have to be willing to leave out anything that doesn’t meet your standards.

After this process, you should be narrowed down to your best images. You can go back over your take again, to see if you missed anything that you need to help tell the story. And you may want to go back, the first few times you try this method, until you become more confident in your editing.

Once you’re done, select your edited best images and batch rename just those images, this time starting your sequence at 001. You keep the YEAR-DATE-SLUG, and just change the number that follows them.

Now when you open your folder, your best photos will show up at the top, named YEAR-DATE-SLUG_001, YEAR-DATE-SLUG_002, etc.

Now your edited take should look like this, with your favorites renamed as 001, 002, etc.

Now your edited take should look like this, with your favorites renamed as 001, 002, etc.

At this stage, and before I start my post processing, I’ll usually back up this batch of edited, renamed and metadata-infused images to an external hard drive or two. That way if something really bad happens, I won’t have to start over. Once I’ve completed my post processing and exported my finished images, I’ll back up my entire edit, my worked photos and my exports, and I’ll delete this folder from the middle stage of my process.

Where does that leave us?

  1. Now we have one folder for all of our photos. Inside, individual shoots are arranged by date and slug, so we can easily lay our hands on the photos we’re looking for.

  2. Each photo has metadata embedded, which makes it easy to find photos by simply doing a keyword search.

  3. The very best images from each shoot have been picked, and they’re numbered so you see them first when you open up a folder and arrange by file name.

  4. Images have been worked and exported as needed, and the originals and at least one duplicate set has been backed up.

Archiving 3.png
Archiving 5.png

After you go through this process, it gets easier. And you start populating a folder arranged so you can find your work when you want it. That’s your archive.

If you’re like that wedding photographer from the previous post, I hope this helps you to tackle your edits without being intimidated by the idea of having a thousand images to go through. Just break down the process into the steps I described, and you should be on your way to being in control of your photos, and not the other way around.

Archiving 3.png